


Unlocking the Power of Image Optimization and SEO in Node.js
A Step-by-Step Guide to Image Optimization for Top SEO Rankings using Node.js


Table of contents
Unlocking the Power of Image Optimization and SEO in Node.js
Images serve as captivating mediums to convey human emotions and messages. Whether you're showcasing product images on an e-commerce platform or sharing visuals on social media, the size and quality of your images hold significant importance.
Since the inception of web development, developers have grappled with the challenge of optimizing images. Unoptimized images can lead to a host of issues, including sluggish page load times, a subpar user experience, SEO setbacks, increased operational costs, and compatibility glitches.

However, if you're operating in the realm of JavaScript, I've got some valuable insights to help you fine-tune your images for optimal performance and search engine friendliness.
Why Image Optimization Matters
Enhanced Page Load Speed: A speedy website is essential for keeping your audience engaged. Optimized images ensure faster loading times.
Improved User Experience: A snappy, responsive website keeps visitors happy. Quick page load times contribute to a seamless user experience.
SEO Benefits: Search engines appreciate fast-loading websites. Optimized images can boost your search engine rankings.
Cost Savings: Smaller image files mean reduced storage and bandwidth costs for your website.
Cross-Device Compatibility: Optimized images ensure your content looks great on various devices, from desktops to smartphones.
Getting Started with Node.js for Image Optimization and SEO
Before delving into the world of image optimization and SEO in Node.js, make sure you meet these prerequisites:
Node.js and npm are installed on your local development environment.
A basic understanding of writing and running Node.js programs.
Familiarity with asynchronous programming in JavaScript, including the Event Loop, Callbacks, Promises, and Async/Await.
With these basics in place, you're ready to embark on a journey to optimize your images like a pro and elevate your SEO game.
In the upcoming sections of this blog, we'll explore how to leverage Node.js and JavaScript to fine-tune your images and improve your website's SEO performance. Stay tuned for practical tips, techniques, and code examples to help you achieve remarkable results.
Note: This blog post is based on the principles and techniques outlined in the Sharp documentation. For a more in-depth understanding and detailed information, be sure to explore the official documentation provided by the Sharp Library.
Step 1: Setting Up Your Project
To kickstart this project, the first step is to create a new folder. Feel free to give it any name you prefer. For the sake of this project, we'll name it 'image-optimization'.
You can either create the folder manually or use the terminal with the following commands:
mkdir image-optimization
cd image-optimization
To manage project dependencies, you can use the "npm init" command to generate a package.json file:
npm init -y
We'll be using the 'sharp' library to manipulate images, which can be installed with:
npm install sharp
You'll need an image to work with. For this example, we'll use an image from Unsplash, which you can find here. Store the image in the 'asset' folder.

Step 2: Reading Images
First, open your preferred text editor. We'll use VSCode for its user-friendly interface. Create a file named 'index.js'.
In this project, we'll use modular JavaScript. To enable this, go to the package.json file and add "type": "module".
Next, import 'sharp' at the top of the 'index.js' file:
import sharp from "sharp";
Define the 'imagePath' variable to store the path of the image you wish to read:
const imagePath = "./asset/original.jpg";
We'll create a 'readImage' function that takes a path as an argument. Inside this function, we'll use 'sharp(path)' to open the image file and then call '.toBuffer()' to read the image data. This operation is asynchronous, so we use 'await' to wait for it to complete. If any errors occur during image reading, we catch the error and throw a new error with an error message:
const readImage = async (path) => {
  try {
    return await sharp(path).toBuffer();
  } catch (error) {
    throw new Error("Error reading image: " + error.message);
  }
};
The 'readImage' function is called with 'imagePath' as an argument using '.then()' and '.catch()' to handle the promise. If the image is successfully read, it logs the image data to the console. If there's an error during image reading, it logs the error message to the console:
readImage(imagePath)
  .then((imageData) => {
    console.log(`image data: ${imageData}`);
  })
  .catch((error) => {
    console.log(error.message);
  });
To run the code, use the following command in the terminal:
node index.js
Or simply:
node index
Now, let's make our code more organized. Create a new file named 'imageHelper.js' to separate the 'readImage' function and its dependencies for reusability:
imageHelper.js:
import sharp from "sharp";

const readImage = async (path) => {
  try {
    return await sharp(path).toBuffer();
  } catch (error) {
    throw new Error("Error reading image: " + error.message);
  }
};

export { readImage };
In 'index.js', update the code as follows:
index.js:
import { readImage } from "./imageHelper.js";

const imagePath = "./asset/original.jpg";

readImage(imagePath)
  .then((imageData) => {
    console.log(`image data: ${imageData}`);
  })
  .catch((error) => {
    console.log(error.message);
  });
To test the code, run:
node index
Step 3: Extracting Metadata from Images
In 'imageHelper.js', create another function called 'getMetadata', which takes 'imageData' as a parameter and uses '.metadata()' to extract image metadata. This operation is asynchronous, so we use 'await' to wait for it to complete:
imageHelper.js:
import sharp from "sharp";

const readImage = async (path) => {
  try {
    return await sharp(path).toBuffer();
  } catch (error) {
    throw new Error("Error reading image: " + error.message);
  }
};

const getMetadata = async (imageData) => {
  try {
    return await sharp(imageData).metadata();
  } catch (error) {
    throw new Error("Error getting image metadata: " + error.message);
  }
};

export { readImage, getMetadata };
Now, update 'index.js' to utilize the 'getMetadata' function:
index.js:
import { readImage, getMetadata } from "./imageHelper.js";

const imagePath = "./asset/original.jpg";

readImage(imagePath)
  .then(async (imageData) => {
    try {
      const metadata = await getMetadata(imageData);
      console.log("Image metadata:", metadata);
    } catch (error) {
      console.error(error.message);
    }
  })
  .catch((error) => {
    console.log(error.message);
  });
With these changes, the 'then' block in 'index.js' has been updated to be asynchronous to accommodate the 'getMetadata' function. When you run the code, you'll see the image metadata displayed in the console.
Step 4: Converting Buffer into PNG, JPEG, and WEBP
To convert the buffer into JPEG, we'll create a function called convertToJPEG in imageHelper.js. This function takes the buffer and an optional file name. If the user forgets to provide a file name, it defaults to the current timestamp.
const convertToJPEG = async (buffer, fileName = new Date().getTime()) => {
  await sharp(buffer)
    .jpeg({ mozjpeg: true })
    .toFile(
      path.join(outputFolder, `${fileName}.jpeg`),
      imageConversionCallback
    );
};
Buffer is converted into JPEG, utilizing the 'mozjpeg' option to compress the image without compromising quality. The converted image is stored in the 'output' folder.
To make the code more maintainable, we've separated the callback function, allowing you to reuse it for PNG and WEBP generation:
const imageConversionCallback = (err, info) => {
  if (err) {
    console.log(`Error converting image: ${err}`);
  } else {
    console.log(`Image converted!`);
  }
};
The process for converting the image buffer to PNG and WEBP is similar, with adjustments in the method used:
const convertToPNG = async (buffer, fileName = new Date().getTime()) => {
  await sharp(buffer)
    .png()
    .toFile(
      path.join(outputFolder, `${fileName}.png`),
      imageConversionCallback
    );
};
const convertToWEBP = async (buffer, fileName = new Date().getTime()) => {
  await sharp(buffer)
    .webp()
    .toFile(
      path.join(outputFolder, `${fileName}.webp`),
      imageConversionCallback
    );
};
With these changes, your 'index.js' code now looks like this:
import {
  readImage,
  getMetadata,
  convertToJPEG,
  convertToPNG,
  convertToWEBP,
} from "./imageHelper.js";

const imagePath = "./asset/original.jpg";

readImage(imagePath)
  .then(async (imageData) => {
    try {
      convertToJPEG(imageData, "test-image-jpg");
      convertToPNG(imageData, "test-image-png");
      convertToWEBP(imageData, "test-image-webp");
    } catch (error) {
      console.error("Error: ", error.message);
    }
  })
  .catch((error) => {
    console.log(error.message);
  });
Now, when you run the code, you'll find three image files under the 'output' folder.
Step 5: Image Compression
Image compression is the process of reducing image file size while maintaining quality. In your 'convertToJPEG' function, you used .jpeg({ mozjpeg: true }), which is a form of image compression. This step focuses on adjusting image quality.
Sharp has a 'quality' property by default for JPEG, PNG, and WEBP. Here's the format and quality ranges:
JPEG: 0 to 100 (100 for the highest quality)
WebP: 0 to 100 (100 for lossless quality)
PNG: 0 to 9 (lower values reduce color depth)
You can now set the quality as an optional parameter in the conversion functions:
const convertToJPEG = async (
  buffer,
  fileName = new Date().getTime(),
  quality = 80
) => {
  await sharp(buffer)
    .jpeg({ mozjpeg: true, quality })
    .toFile(
      path.join(outputFolder, `${fileName}.jpeg`),
      imageConversionCallback
    );
};
const convertToPNG = async (
  buffer,
  fileName = new Date().getTime(),
  quality = 6
) => {
  await sharp(buffer)
    .png({ quality })
    .toFile(
      path.join(outputFolder, `${fileName}.png`),
      imageConversionCallback
    );
};
const convertToWEBP = async (
  buffer,
  fileName = new Date().getTime(),
  quality = 80
) => {
  await sharp(buffer)
    .webp({ quality })
    .toFile(
      path.join(outputFolder, `${fileName}.webp`),
      imageConversionCallback
    );
};
The functions now have default values for quality, making it optional when converting images.
To apply this in your 'index.js', you can use:
convertToJPEG(imageData, "test-image-compressed-jpg", 65);
convertToPNG(imageData, "test-image-compressed-png", 4);
convertToWEBP(imageData, "test-image-compressed-webp", 65);
Running the code with these changes will give you compressed images.
After running the code, navigate to the 'output' folder in your terminal:
cd output
To compare file sizes, you can use:
ls -lh | awk '{ printf "%-40s %s\n", $9, $5 }'
This command will display a comparison of the file sizes.
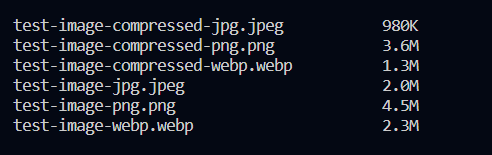
The original image size was 2.5MB.

Step 6: Resizing Images
Image resizing is an effective method for image optimization. You've provided two functions to resize images: one by percentage and the other by specifying height and width.
For resizing by percentage, you've created the resizeByPercentage function, which takes an image buffer and a percentage as parameters. This function utilizes the .resize() method with the percentage as a parameter and returns a new buffer.
const resizeByPercentage = async (imageBuffer, percentage) => {
  try {
    return await sharp(imageBuffer).resize({ percentage }).toBuffer();
  } catch (error) {
    throw error;
  }
};
And for resizing by specific dimensions, you've created the resizeBySize function, which takes the image buffer, width, and height as parameters. It uses the .resize() method with the specified dimensions and returns the resized image buffer.
const resizeBySize = async (imageBuffer, width, height) => {
  try {
    const resizedImageBuffer = await sharp(imageBuffer)
      .resize(width, height)
      .toBuffer();
    return resizedImageBuffer;
  } catch (error) {
    throw error;
  }
};
You've also added these functions to the imageHelper.js file and updated the exports.
In your index.js file, you've incorporated the resizing functions. Here's the updated code:
import {
  readImage,
  getMetadata,
  convertToJPEG,
  convertToPNG,
  convertToWEBP,
  resizeByPercentage,
  resizeBySize,
} from "./imageHelper.js";

const imagePath = "./asset/original.jpg";

readImage(imagePath)
  .then(async (imageData) => {
    try {
      // New code for resizing
      const resizedPercentageBuffer = await resizeByPercentage(imageData, 30);
      const resizedSizeBuffer = await resizeBySize(imageData, 1629, 1013);

      // Converting resized images to JPEG
      convertToJPEG(resizedPercentageBuffer, "resizedPercentageBuffer");
      convertToJPEG(resizedSizeBuffer, "resizedSizeBuffer");
      convertToJPEG(resizedPercentageBuffer, "resizedPercentageBuffer-50", 50);
      convertToJPEG(resizedSizeBuffer, "resizedSizeBuffer-50", 50);
    } catch (error) {
      console.error("Error: ", error.message);
    }
  })
  .catch((error) => {
    console.log(error.message);
  });
You've successfully integrated image resizing into your process, reducing the image size by about 60.8% after decreasing quality and resizing the image by 30%.
Step 7: Improving Image SEO with EXIF Data
Search engine optimization (SEO) for images is crucial. You've introduced a function, updateEXIF, to update the EXIF (Exchangeable Image File Format) metadata, which helps search engines better understand and index your images. This step focuses on JPG and WebP formats.
Here's the updateEXIF function that takes image buffer, options, type, file name, and quality as parameters:
const updateEXIF = async (
  imageBuffer,
  options,
  type,
  fileName = new Date().getTime(),
  quality
) => {
  let buffer = imageBuffer;

  if (!type || (type !== "jpg" && type !== "webp")) {
    throw new Error("Error on type: Please provide JPG or WebP");
  }

  if (quality) {
    buffer = await sharp(imageBuffer)
      .jpeg({
        quality,
      })
      .toBuffer();
  }

  await sharp(buffer)
    .withMetadata({
      exif: {
        IFD0: {
          Copyright: options?.copyright ?? "",
          ImageDescription: options?.description ?? "",
          XPTitle: options?.title ?? "",
          XPComment: options?.comment ?? "",
          XPKeywords: options?.tags ?? "",
          XPAuthor: options?.author ?? "",
          Artist: options?.author ?? "",
        },
        IFD3: {
          GPSLatitudeRef: options?.GPSLatitudeRef ?? "",
          GPSLatitude: options?.GPSLatitude ?? "",
          GPSLongitudeRef: options?.GPSLongitudeRef ?? "",
          GPSLongitude: options?.GPSLongitude ?? "",
        },
      },
    })
    .toFormat(type, {
      quality: 50,
    })
    .toFile(
      path.join(outputFolder, `${fileName}.${type}`),
      imageConversionCallback
    );
};
You've also imported the updateEXIF function in your index.js and updated the code to include this function.
This step enhances your image SEO efforts by providing EXIF metadata, including copyright, description, title, comments, tags, author information, and even GPS coordinates if needed.
Your tutorial is now well-equipped with image resizing and SEO improvements. If you have any further questions or need additional assistance, please feel free to ask.
Conclusion
In a nutshell, this tutorial empowers you to make your website's images better. It's all about speedy loading, happier users, and a thumbs-up from search engines.